.
After a closer viewing on a monitor with
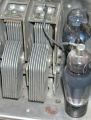
better resolution, compared to the laptop one I initially used, the following becomes more apparent. The small bottom photo shows the inductor having both a male
and female insulated terminal outputting. I initially visually perceived dual female connectors.
What seemed like a top view of a grey canned electrolytic, with the now easier visible white top markings, would be more indicative as the knob atop the motor speed potentiometer located below it.
Off center there is a white 6 pin optical isolator/driver ? and at the top left quadrant there are only two pins viewable of probably an 8? pin DIP with the Red leads insulative cover blocking its full viewing. At the top right corner there is SCR symbolization and the ceramic 5-7 watt wire-wound resistor is what one might expect for adjunct SCR snubbing duty unless it is of quite low resistancce value .In that case it just might be a current sensing/limiting resistor as mentioned. Symbolization on a few of the TO-220 cases seem more distinct as power diodes polarizations. Can’t see the bottom to see if only two leads are utilized, though.
(The sole treadmill….. that I once repaired in a relatives home was as simple as checking that the power was present and then checking for DC voltage across IC’s Vcc’s and detecting that there was none present . Seems that raw AC was applied to a dropping resistor and then ½ wave diode rectified and electrolytically filtered and a shunt 1 watt zener then provided regulation. The zener had shorted and was the problem…….easy fix.)
That and an additional of a 130V MOV across the AC line past the fuse was my only final preventative addition.
The integrated circuit at off center board positioning is easily visible as a LM324 quad op amp. Not what one would expect to find, as compared to the utilization of a dedicated all-in-one special/dedicated PWM chip. The four trim pots at the side along with the absence of the electrolytic filter previously mentioned….. all would be indicative of the use of a mere two power steering diodes along with the use of SCR(s) and the LM324 circuitry establishing the variable gate firing level/duration up the slope. The timing being relevant to the different degreee of power output. The smoothing choke would be in series with the motor and the connection to the ‘A’ output terminals, with one being the choke and the other the motor. I would expect the last missing piece of the total apparatus being a missing power switch and its wiring harness for the hot line (Blk) of the AC with its two wires and insulated female push on connectors. One connecting to the open/vacant fuse terminal and the other to one of the ‘AC’ terminals on the PCB with the other ‘AC’ terminal receiving the low (Whi) line cord connector .
Personally, I would probably still use the 100 watt incandescent lamp for initial testing at ‘A’-‘A’ terms. If all is well, the lamp should ramp up and down in brightness in response to the speed adjustment pot. If you will place your ear up close to the lamp you can hear the duty cycle of the motor drive voltage when being changed by the pot. It seems that the coiled filament acts as somewhat of an acoustical transducer…albeit, somewhat weak and inefficient. Should you attempt the same with a PWM controller circuit, it is readily more evident, with them operating on up towards the ~1 KHZ range, where it is even easier hear the changing whine intensity.
Viewing the heat sink of the unit shows two mounting slot holes with the probability of a matching set on the (non viewable) other side. If the controller unit is thermally stressed, the original application may have also had in consideration the additional lateral thermal dispersion to be attained if that alum controller heatsink was mounted onto a large bottom sheet metal panel of the units housing superstructure with those bolts. If it was a plastic/polycarbonate panel…no consideration required.
73's de Edd
[email protected] ..........(Interstellar ~~~~Warp~~~Speed)

......Beam me up, Scotty
[email protected]........(Firewalled*Spam*Cookies*Crumbs)

 Hot glass looks the same as cold glass...... Cunino's Law of Burnt Fingers
.