Page 3 of 7
Posted: Tue Dec 23, 2008 10:14 am
by MrAl
Hi again,
Yeah the impurities thing is a good point, i'd be very careful,
especially when the stuff is not quite totally cured yet.
I almost got some standard silicone today too, but it was 5 bucks and
i was already getting a lot of other things at Home Depot this morning.
But that stuff might actually catch fire when wet, i dont know i never
tried this kind of test on silicone.
A one inch thickness might be too thick to measure the leakage
current with only 120v applied, so maybe when you do this make
a thinner piece too, like 1/16 inch thick or something like that.
I could try this too with the hot glue at least and we could compare
notes. I am guessing that it is pretty good, unless of course it
cracks, where moisture could get in and provide a shock path.
I've seen hot glue crack in several different applications when it
is bent too sharply or handled too harshly, so we'd have to be
careful about that too.
Happy testing

hot glue
Posted: Sun Dec 28, 2008 6:44 am
by evahle
My first experiment with hot glue was using a small plastic cap for a form. I used petroleum jelly to line the inside of the cap to prevent the hot glue from sticking.
After filling the cap with hot glue, I placed 3 LEDs (Red, White & Blue) inside before the glue hardened.
This is what it looked like after lighting each LED the next day:
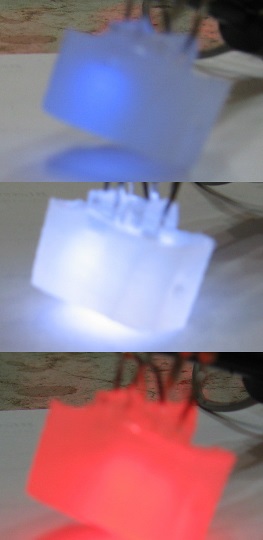
Notice how it has a warm glow when lit, which is what I wanted. Now I could make any shape, for any project. I'm very particular about my projects and expect them to look as professional as possible. That was a fun experiment and I'm ready for the next one.
FOR MORE PICTURES SEE PAGES 6 & 7, this forum.
evahle
Posted: Sun Dec 28, 2008 8:13 am
by Janitor Tzap
Looks pretty good evahle,
The only thing is the RED LED looks much brighter then the WHITE or BLUE LED's.
Did you check and see what the Mcd rating was for them?
Is it the way the LED's were placed into the glue?
Thus, the light from the RED LED is refracted more by the glue.
Or maybe...
It's just the glue itself has particles in it that react more to RED wave length, then WHITE or BLUE?
Ok, I'm nit picking.

But if this is to be a visual display.
You'd want the light intensity from the LED's to be close as possible.
Signed: Janitor Tzap
Posted: Sun Dec 28, 2008 8:22 am
by MrAl
Hi,
The way you deal with the different light intensities is to vary
the current through each LED. This way you can get any
intensity you want.
hot glue
Posted: Sun Dec 28, 2008 8:51 am
by evahle
Good questions.
The placement of the LEDs did have an effect. The angle of the white LED is 5-25deg. and it is in the middle, causing it to shine more downward than the other LEDs. The blue LED is only 300mcd, the white is 15,000mcd and the red is 4,000mcd
I selected the resistors on each LED to produce 20ma each. The red LED was closer to the camera. I don't know what the viewing angle is for either the blue or red LEDs. All the LEDs were just some LEDs I had on hand to experiment with. I just received an order for better ones and will start using them for further experiments.
evahle
Posted: Sun Dec 28, 2008 11:51 am
by MrAl
Hi again,
I have a three color LED (red, blue, green) and the three colors
dont show up as bright with that either. All i do is make the current
different for each color to get them all the same brightness.
This requires different resistors or different pulse widths for PWM.
BTW, the forward voltage for all three is different too, as low as
2v for the red and 3.3 for the blue. This means selecting the
resistor for each color a little different too (fixed resistor solution).
Posted: Sun Dec 28, 2008 3:32 pm
by jwax
I have access to a high voltage (up to 5,000 VDC) hipot tester.
So we're interested in testing hardware store silicone, and a two-part epoxy? And particular brands?
As far as dielectric constant, make a parallel plate cap with the sample material between the plates. Seems to me the dielectric constant may vary somewhat with frequency with polymer dielectrics.
Posted: Sun Dec 28, 2008 3:41 pm
by MrAl
Hi John,
Can you do hot glue too please?
I would like to know the leakage current at 1000v.
Perhaps two 1 inch squares of copper with hot glue
in between, about 1/32 inch thick maybe.
Posted: Sun Dec 28, 2008 3:47 pm
by jwax
OK. Should be able to test that this week!

Posted: Sun Dec 28, 2008 3:50 pm
by Robert Reed
For what its worth-
I just glued up a special probe with epoxy cement. Probe tip and input coupling cap were both imbedded in glu and cemented to a plastic substrate.
It performed the same as before the glue was applied at frequencys from 1 to 500 MHz. I know this isnt the best test for dielectric although both tip and cap were completly submerged in it and as little as 0.05 pf 3would have effected the results
The glu was the common hardware store type that comes in a stereo tube. I tossed the label but its very likely the same stuff in your local hardware.
hot glue
Posted: Sun Dec 28, 2008 5:48 pm
by evahle
Hi guys. Sounds like some really great tests. The tube of silicone that I bought at Home Depot was: GE Silicone I 100% Silicone Rubber Sealant, for Doors & Windows, in a blue, white & grey tube. It is for indoor/outdoor use. Since the high voltage tests are already going to be done, I think I'll use the silicone to form up my new LEDs as well as doing a corrosion test on the leads. The corrosion test would be good for outdoor sensor projects.
I'll do the same test with hot glue.
evahle
Posted: Mon Dec 29, 2008 8:31 am
by Engineer1138
This is fantastic. Every so often I want to pot an electronics project, but I'm too cheap to buy a bucket of Master Bond potting epoxy ($50 a quart!). If hot glue or silicone will work without corroding leads, that would be great.
I have used Master Bond before and it works great, just too expensive for hobby projects and IIRC, it doesn't store very well.
Posted: Mon Dec 29, 2008 11:20 am
by MrAl
Hi again,
Thanks Robert. Did you ever try hot glue for that purpose too?
John, cant wait to hear the results.
Posted: Mon Dec 29, 2008 2:35 pm
by jwax
I fabricated a "parallel-plate capacitor" using two 1" square copper plates, and two narrow (.062") strips of .040" thick glass as spacers on opposite ends of the copper plates. I filled the space in between with hot melt glue and let it cool.
Tested high voltage resistance with a Fluke 1550B HiPot Tester. Setup was the applied voltage ramps up at 100 volts/second to 1,000 VDC. There it holds for one minute, and then measures the resistance at 1000 volts applied. This hot-melt package read "Overrange", which is higher than a million megohms (One Teraohm). Very good insulation indeed!
I'm still researching what the manufacturers spec is for EVA bulk resistivity, but it is right up there.
Also put the assembly on a cheap capacitance meter and read 12 pfd. That translated into a dielectric constant of about 2. Not easy getting a good reading on that small of a cap however.
Next on the test table will be Silicone (GE Silicone II, 100% silicone, indoor/outdoor, clear), and some Loctite QuickSet 5 minute "stereo" type of two-component epoxy.

Posted: Mon Dec 29, 2008 3:21 pm
by psycho
You got me. I didn't know what, exactly, a HiPot test (or tester) was. I looked it up on wikipedia like I do for everything and it all makes sense now
For those of you who are interested:
http://en.wikipedia.org/wiki/Hipot
Thanks for the "something I learned today"...
Kevin